Updating Gandi.net DNS and using a Reverse Proxy with a Synology NAS
In this article, you’ll find everything you need to update Gandi.net DNS from a Synology NAS, as well as to set up a reverse proxy for your services on your local network.
Goal
Context
We would like to use a personal domain name from Gandi.net named testing.com to access the available services behind a personal internet access (Livebox router) according to the sub-domains defined.
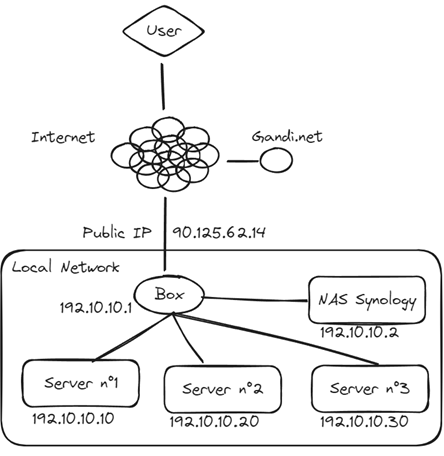
We have a local network containing the following equipment:
- Livebox router with local address 192.10.10.1 (Public address : 90.125.62.14)
- Synology NAS with local address 192.10.10.2
- Local server n°1 to host the VPN service with local address 192.10.10.10
- Local server n°2 to host the GAME service with local address 192.10.10.20
- Local server n°3 to host the TODO service with local address 192.10.10.30
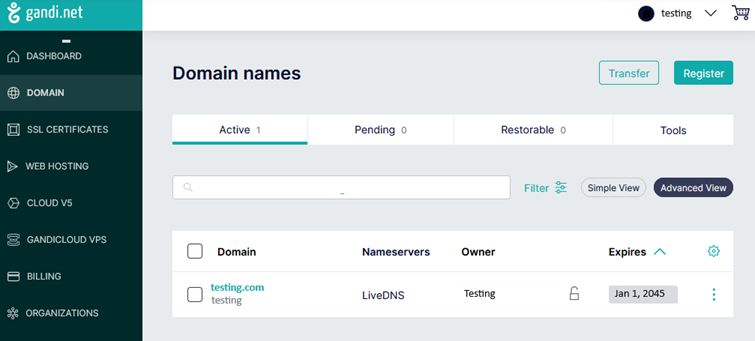
We have an active testing.com domain name at Gandi.net.
Schema :
Constraint
The Livebox router can only manage IPv4, the public IP address is not fixed and we don’t know when it changes, so we need to be able to check our public IP address regularly to update Gandi.net’s DNS when necessary.
Usage
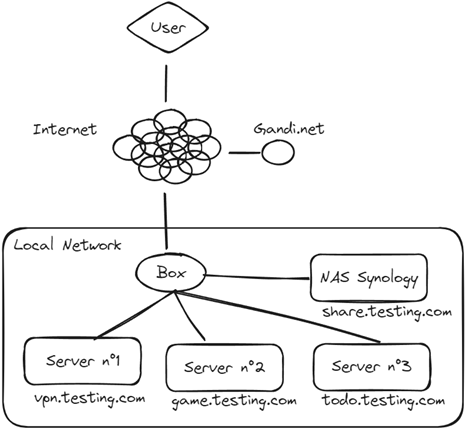
- When a user wants to access the url
https://vpn.testing.comthen he must be automatically redirected to local server n°1. - When a user wants to access the url
http://game.testing.comthen he must be automatically redirected to local server n°2. - When a user wants to access the url
http://todo.testing.comthen he must be automatically redirected to local server n°3. - When a user wants to access the url
https://share.testing.comthen he should be automatically redirected to the Synology NAS.
Schema :
List of steps
To set up the necessary elements, we will do the following steps:
- Create an access token to the Gandi.net API
- Configure the Livebox router to redirect incoming internet traffic to the Synology NAS.
- Create and update Gandi.net DNS with the Public IP address associated with the Livebox router.
- Set up a reverse proxy on the Synology NAS to access the servers.
Create an access token to the Gandi.net API
The access token will enable us to use the API provided by Gandi.net to automate the necessary modifications to DNS records when changing public IP addresses.
How to create an access token :
- Log in to your administration account at Gandi.net
- Click on the
Organizationsmenu
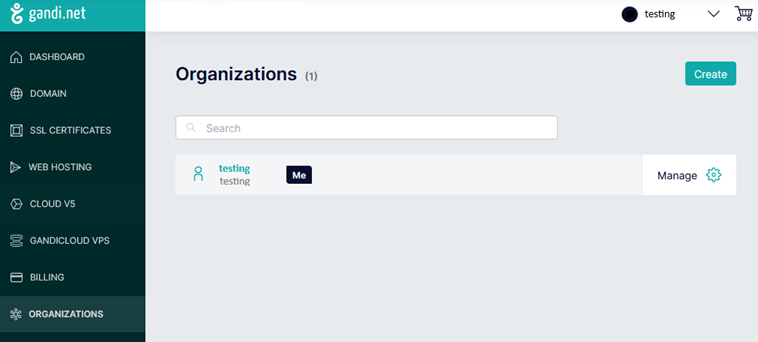
- Click on the organization of your choice
- Click on the
Sharingtab
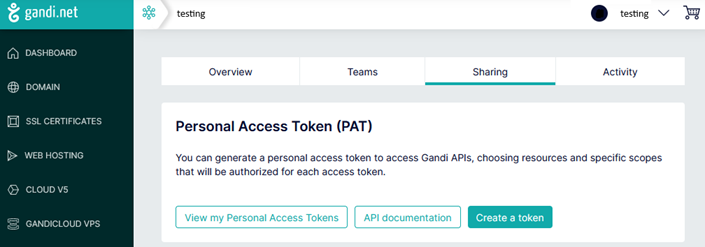
- In the
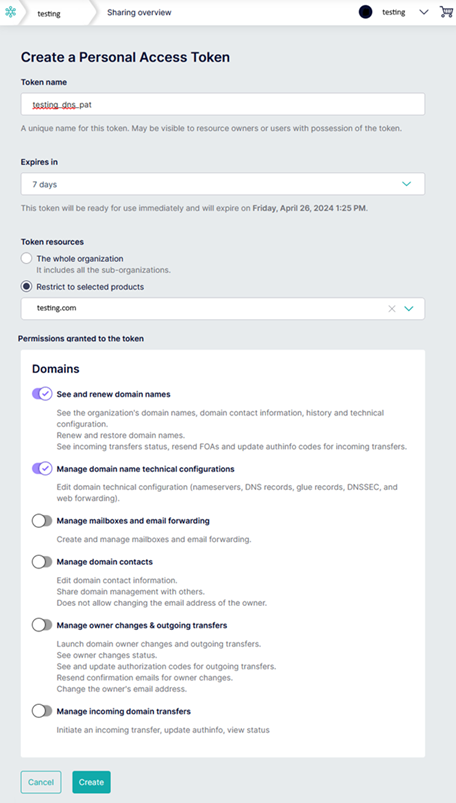
Personal Access Token (PAT)part, click on theCreate a tokenbutton - Fill in the necessary data
- Enter token name (e.g.
testing_dns_pat) - Select the token validity period between 7 days and 1 year (e.g.
7 days) - Check the
Restrict to selected productsbox and select the desired domain (ex:testing.com) - Check the
See and renew domain namesbox - Check box
Manage domain technical configurations - Click on the
Createbutton
- Enter token name (e.g.
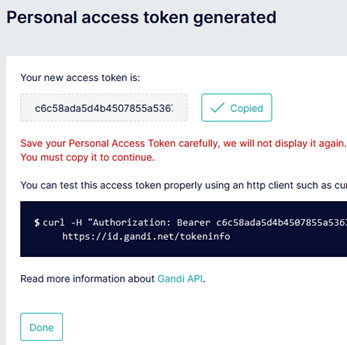
- Copy the access token you’ve created to a secure location, as it will no longer be accessible
Setting up the router
We’re going to set up a redirection of incoming Internet traffic to the Synology NAS by default, so that the Synology NAS can act as a reverse proxy to redirect users to the local server defined according to the incoming address used.
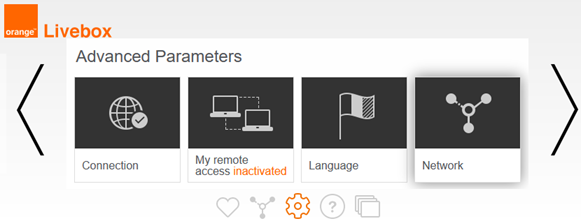
How to configure your Internet box :
- Log in to the livebox administration account
- Go to
Advanced Parametersmenu - Click on
Networkoption
- Click on the
NAT / PATtab - Add a rule to redirect incoming HTTP traffic to the Synology NAS and click
Create.- Application/Service : Reverse Proxy HTTP
- Internal Port : 80
- External Port : 80
- Protocol : TCP
- Equipment : 192.10.10.2
- External IP : All
- Add a rule to redirect incoming HTTPS traffic to the Synology NAS and click
Create.- Application/Service : Reverse Proxy HTTPS
- Internal Port : 443
- External Port : 443
- Protocol : TCP
- Equipment : 192.10.10.2
- External IP : All

Creating and updating Gandi.net DNS
Warning: it may take several hours for a DNS change to take effect, depending on its configuration.
To create and update Gandi.net’s DNS information, we’re going to use Gandi.net’s public API and create a script that will be run directly on the Synology NAS.
Create a directory on the NAS to store the script to be executed
- Go to the
File Stationapplication - Navigate to the
Sharedirectory - Create a
Scriptsub-directory
Note : The complete address of the directory will be volume1/Share/Script
Create a script named Gandi_Update_DNS.sh
The Gandi_Update_DNS.sh script must be created in the volume1/Share/Script directory on the Synology NAS.
We define the important parameters of the script at the beginning :
- The Gandi API access token will be in the variable:
TOKEN_GANDI. - The domain name will be in the variable:
DOMAIN_GANDI. - The list of sub-domains to be updated will be in the variable:
RECORDS_GANDI.
Based on this information, we can create the following script :
 1#!/bin/sh
 2
 3# Configure data
 4TOKEN_GANDI="<testing_dns_pat>"
 5DOMAIN_GANDI="testing.com"
 6RECORDS_GANDI="share vpn game todo" #subdomain listing
 7RECORD_TYPE_GANDI="A"
 8RECORD_TTL_GANDI="1200"
 9
10RECORD_GANDI=$(echo $RECORDS_GANDI | cut -d" " -f1)
11
12# 1. Get Public IP
13CURRENTIP_GANDI=$(curl -s -4 ifconfig.co/ip)
14IPLENGTH_GANDI=$(echo -n ${CURRENTIP_GANDI} | wc -m)
15
16# Check that ifconfig.io give me an IP
17if [ -z "${CURRENTIP_GANDI}" ]
18then
19  echo "\n$(date +"%Y-%m-%d %H:%M:%S") - Error - CURRENTIP_GANDI is empty"
20  exit 1
21fi
22
23if [ ${IPLENGTH_GANDI} -gt 16 ] || [ ${IPLENGTH_GANDI} -lt 7 ]
24then
25  echo "\n$(date +"%Y-%m-%d %H:%M:%S") - Error - CURRENTIP_GANDI issue : [${CURRENTIP_GANDI}]"
26  exit 1
27fi
28
29
30# 2. Get gandi's NS for my domain
31NS_GANDI=$(curl -X GET "https://api.gandi.net/v5/livedns/domains/${DOMAIN_GANDI}/nameservers" -H "authorization: Bearer ${TOKEN_GANDI}" | jq '.[0]' | sed 's/"//g')
32
33# 3. Get the last IP recorded
34LASTREGISTEREDIP_GANDI=$(/var/packages/DNSServer/target/bin/dig +short ${RECORD_GANDI}.${DOMAIN_GANDI} @${NS_GANDI})
35LASTREGISTEREDIPLENGTH_GANDI=$(echo -n ${LASTREGISTEREDIP_GANDI} | wc -m)
36
37if [ -z "${LASTREGISTEREDIP_GANDI}" ]
38then
39  echo "\n$(date +"%Y-%m-%d %H:%M:%S") - Error - LASTREGISTEREDIP_GANDI is empty"
40  exit 1
41fi
42
43if [ ${LASTREGISTEREDIPLENGTH_GANDI} -gt 16 ] || [ ${LASTREGISTEREDIPLENGTH_GANDI} -lt 7 ]
44then
45  echo "\n$(date +"%Y-%m-%d %H:%M:%S") - Error - LASTREGISTEREDIP_GANDI issue : [${LASTREGISTEREDIP_GANDI}]"
46  exit 1
47fi
48
49
50# 4. Update if needed
51if [ "${CURRENTIP_GANDI}" != "${LASTREGISTEREDIP_GANDI}" ]
52then
53    for SUB_GANDI in $RECORDS_GANDI; do # Loop on all domaine to use the same IP Address
54      echo "\n$(date +"%Y-%m-%d %H:%M:%S") - Info - DNS Record for [$SUB_GANDI] sent"
55      curl -X PUT https://api.gandi.net/v5/livedns/domains/${DOMAIN_GANDI}/records/${SUB_GANDI}/${RECORD_TYPE_GANDI} \
56              -H "authorization: Bearer ${TOKEN_GANDI}" \
57              -H "Content-Type: application/json" \
58              -d "{\"rrset_values\": [\"${CURRENTIP_GANDI}\"], \"rrset_ttl\": "${RECORD_TTL_GANDI}"}"
59    done
60    echo "\n$(date +"%Y-%m-%d %H:%M:%S") - Info - DNS Record has changed !!!!"
61    exit 2
62fi
63
64exit 0
The major steps are as follows :
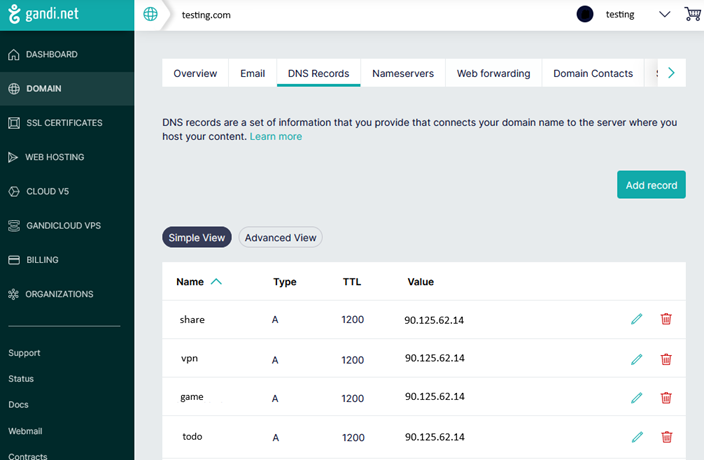
curl -s -4 ifconfig.co/ip(result :90.125.62.14) : Get our current public IP addresscurl -X GET "https://api.gandi.net/v5/livedns/domains/${DOMAIN_GANDI}/nameservers" -H "authorization: Bearer ${TOKEN_GANDI}" | jq '.[0]' | sed 's/"//g': Retrieving the main Gandi.netnameserverfor ourtesting.comdomain/var/packages/DNSServer/target/bin/dig +short ${RECORD_GANDI}.${DOMAIN_GANDI} @${NS_GANDI}: Retrieving the public IP address registered in the DNS of Gandi.net for the domaintesting.com- If the current public IP address is different from the public IP address registered in Gandi.net’s DNS, then the information is updated for each sub-domain entered
Automate execution of Gandi_Update_DNS.sh script
To automatically run a script on the Synology NAS, follow these steps:
- Click on the
Main menu(top left on the main screen) - Click on the
Control Panelapplication - Click on the
Task Schedulermenu - Click on the
Createbutton and select theScheduled Task > User-defined scriptoption- Fill in the information on the
Generaltab and check theEnabledbox - Fill in the information on the
Scheduletab, with the frequency and time of script execution - Fill in the
Task Settingstab- Check box
Send run details by email - Check box
Send run details only when the scrip terminates abnormally - Enter your e-mail address to receive information in the event of script error
- Enter the command to be executed in
User-defined script. The command isbash <script path>/Gandi_Update_DNS.sh
- Check box
- Click on the
OKbutton
- Fill in the information on the
- Check that the box is ticked for the added script in the summary screen
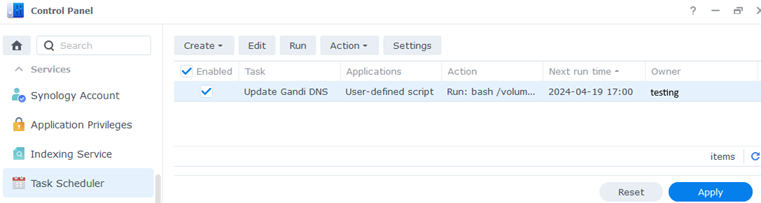
Result of the Gandi_Update_DNS.sh script execution
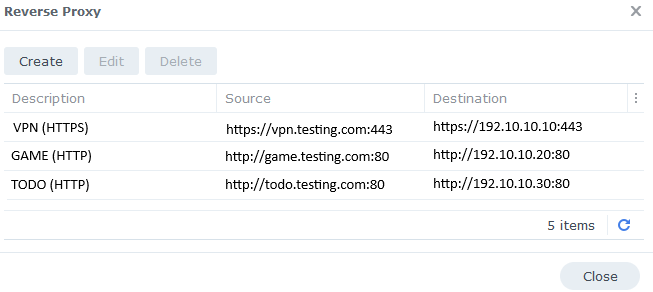
Setting up reverse proxy on Synology NAS
Connect to the Synology NAS and follow the steps below:
- Click on the
Main menu(top left of the main screen) - Click on the
Control Panelapplication - Click on the
Login Portalmenu - Click on the
Advancedtab - Click on the
Reverse Proxybutton

- Click on the
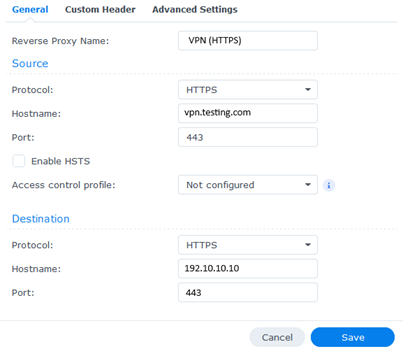
Createbutton - Fill in the following information to redirect the address
vpn.testing.comto server n°1 (192.10.10.10) and click on theSavebutton.- Reverse Proxy Name :
VPN (HTTPS) - Source
- Protocol :
HTTPS - Hostname:
vpn.testing.com - Port :
443
- Protocol :
- Destination :
- Protocol :
HTTPS - Hostname :
192.10.10.10 - Port :
443
- Protocol :
- Reverse Proxy Name :
- Repeat the operation to redirect the
game.testing.comaddress to local server n°2 (192.10.10.20)- Reverse Proxy Name :
GAME (HTTP) - Source
- Protocol :
HTTP - Hostname:
game.testing.com - Port :
80
- Protocol :
- Destination :
- Protocol :
HTTP - Hostname :
192.10.10.20 - Port :
80
- Protocol :
- Reverse Proxy Name :
- Repeat the operation to redirect the
todo.testing.comaddress to local server n°3 (192.10.10.30)- Reverse Proxy Name :
TODO (HTTP) - Source
- Protocol :
HTTP - Hostname:
todo.testing.com - Port :
80
- Protocol :
- Destination :
- Protocol :
HTTP - Hostname :
192.10.10.30 - Port :
80
- Protocol :
- Reverse Proxy Name :
Result of reverse proxy configuration :